Chocolate Chip Whole Wheat Pancakes

Years ago, I decided it was worth investigating the hype with whole wheat flour for things that I traditionally only made with just regular old white flour.

2015-08-22 00.13.50

When I first heard about whole wheat pancakes I was dubious, but after trying it a few times, it really does seem to taste better: richer and more subtly textured than just plain old pancakes.  For good measure I also threw in Guittard dark chocolate chips, but you can make them plain, or add blueberries.

2015-08-22 00.05.35

You’ll notice my pancakes are on the thinner side, but I promise in a stack they’re delicious.  We wish we had a photo of cutting into the stack when the chocolate just oozed out, but unfortunately we were too busy eating to pause for the photo.

2015-08-22 00.07.32

Ingredients

1.5 cup milk
1 cup whole wheat flour
2 tsp sugar
1/2 tsp baking powder
1/4 tsp baking soda
1/4 tsp salt
1 egg
1/2 cup of chocolate chips (but add more if you’re a chocolate fan)
butter for greasing the griddle

1. Whisk together the flour, sugar, baking powder, baking soda and salt (or all the dry ingredients) in a bowl.

2. In a separate bowl, mix together the milk and the egg.

3. Add the dry ingredients to the bowl with the wet ingredients and mix through, leave slightly lumpy.  (note: whole wheat flour is very “thirsty” so you may need to add more milk, just adjust and eyeball it as you mix through the wet and dry ingredients.)

4. Preheat a griddle.  Once hot, add ladles of batter to the griddle. If using chocolate chips, sprinkle a few on each pancake.

5. Cook for a few minutes, until you start to see little bubbles forming on the surface. Flip the pancakes with a turner and cook for a few minutes on the other side, until you peek underneath and see that the bottom is golden brown.

6. Serve with maple syrup and enjoy!

Serves 2, or 1 very hungry person.

Adapted from Fifteen Spatulas.

Lentil Salad with Raisins, Tomatoes and Tarragon

Lentil Raisin salad with tarragon

I absolutely love lentils – any lentils. The red ones or the tiny lentils de puy or even the lowly but versatile green lentil. I love them in salads and soups and mixed in pilaf. They are a wonderful source of protein, especially when eaten with whole grains.           Lentils uncooked

In Israel, every meal, including breakfast starts with salads – multiple salads. While this lentil salad doesn’t come directly from any particular cuisine, it is certainly inspired by Mediterranean cooking. If you can find fresh tarragon, I encourage you to use it. If not, this salad will still be delicious using only a good French dried Tarragon. it will lose a bit of its lustre if kept for a couple of days, but none of its taste or texture. It’s a great way to get children to eat this magical legume because of the raisins. Try it.                            raisins

Lentil Raisin Salad

Yileds: 6-8 generous servings

Ingredients:

1.25 cups dried green lentils

1 teaspoon dried tarragon

1 teaspoon salt

2 Tablespoons Fig Vinegar or white wine vinegar

1/4 cup EVOO

1 pint grape or cherry tomatoes, quartered

1/2 of a small onion thinly sliced or chopped

1/2 cup raisins (dark, light or mixed)

1 Tablespoon fresh tarragon, chopped or 1 additional teaspoon dried

Freshly cracked black pepper

Directions:

  1. After picking through the lentils to make sure that there are no tiny stones or grains, place them in a medium pot and cover with water by about 2 inches. Add the dried tarragon. I like to layer my seasonings so not only do I put tarragon into the mixed salad but I cook the lentils with tarragon. You can also add a little salt if you want but I don’t. Bring the water to a boil, reduce the heat to a strong simmer and cookuncovered for about 18 minutes. Drain well and run cold water over the lentils to stop the cooking.
  2. While the lentils are cooking, prepare the other ingredients in a bowl and toss well. Add the lentils once they have cooled. Enjoy!Lentil raisin sald stage 1

Ratatouille Nicoise

RatatouilleIt always REALLY annoys me when a recipe calls for a little of this and a little of that. What am I supposed to do with the rest of the “this and that?” If you read my recipe for savory galette you would quickly realize that you have left-over zucchini and eggplant. Well who wants to waste great ingredients?

eggplants

This ratatouille recipe is the perfect answer. It’s so versatile and delicious that I make it even when I don’t have left-overs – just because! Ratatouille is a savory stew of vegetables and I have used it as a side to grilled meats, fish or an omelette. It makes a wonderful pasta sauce and if you dice the vegetables fairly small, it can make a wow appetizer by filling baked puff pastry cups with it (you might drain a bit of the liquid off when using it this way). It’s equally delicious hot or at room temperature so is a wonderful side to bring to picnics. It stores well in the fridge and actually intensifies in flavor after the first day. The following recipe is one I have been making for decades and I have no recollection of where it originated. I have tweaked it over the years as I do just about everything, but my apologies for not giving credit to whoever first came up with this. And while I do make this in the oven according to the recipe, in the summer when it is hot, I do it entirely on the stove so I don’t heat up the apartment. Truthfully, it’s just as good either way.

Ratatouille Nicoise                                             ratatouille2

Yields: About 10 cups

Ingredients:

1/2 cup EVOO

2 cups coarsely chopped onion

2 Tablespoons finely chopped garlic

about 1 pound eggplant, trimmed and cubed

2 sweet peppers, any color

6 slim zucchini, any color

1-2 bay leaves

1 teaspoon dried thyme

26.46 oz. Pomi tomatoes or 28 ounce can San Marzano tomatoes crushed or chopped, with liquid

2 Tablespoons tomato paste

1/8 teaspoon (or more if you like things very spicy) hot red pepper flakes (Optional)

About 24 imported black olives (pitted makes life easier, but you can put them in with pits – just warn your eaters!) (SEE NOTE)

About 24 imported green olives

2-3 Tablespoons capers

Salt and pepper to taste

One bunch finely chopped parsley

NOTE: Please buy the best olives you can and these days there is no excuse for using those tasteless olives in a can from California. I like the black oil-cured or Kalamatos olives and a variety of the green. If y ou don’t happen to live near a good source of olives, you can now purchase them online in vacuum-sealed bags, imported from Greece from Nuts.com – one of my favorite (and now Frances’) sources for nuts, dried fruits, spices and so much more.

Directions:

  1. Heat the EVOO in a large Dutch oven or heavy oven-proof pot. Add the onions and garlic and cook until they turn translucent.
  2. Add the eggplant and cook, stirring gently about 5 minutes.
  3. Add the sweet peppers and stir, cooking about 1 minute. Then add the zucchini and salt and pepper to taste. Go easy on the salt since you will be adding olives and capers which are both salty. Add the bay leaves and thyme and cook about 5 minutes more.
  4. Add the tomatoes, tomato paste and red pepper flakes. Bring to a boil and add the olives and parsley. Cover tightly and cook about 10 minutes.
  5. Bake uncovered in a preheated 350 degree F oven for about 30 minutes.

Savory Galette with Eggplant, Zucchini and Feta

Savory Galette platedOnce you learn certain basic techniques, then you can feel free to experiment. I had so much fun making the tomato and plum galette that I thought I would see what other great combinations I could make. The farmers’ market today had beautiful zucchini and eggplants eggplant and zucchiniand my lemon thyme and oregano plants are quite lush and could do with a bit of judicious trimming. I debated about the cheese, but when I remembered that I still had half of a nice chunk of feta in my fridge, leftover from the green fattoush salad, my decision was made. And here is the delicious result:

Savory Galette with Eggplant, Zucchini and Feta

Ingredients:

For the crust

1.25 cups, unbleached all-purpose flour

2 Tablespoons lightly toasted pine nuts

1/2 teaspoon freshly cracked black pepper

1/2 teaspoon sea salt

1/2 teaspoon fresh thyme leaves (if you have it, use lemon thyme)

8 Tablespoons (1 stick) unsalted butter, very cold

2 Tablespoons Greek Yogurt (I used Fage 2% Plain)

5 Tablespoons ice water

For the filling

3 cups thinly sliced zucchini and eggplant (See Note)

1/2 teaspoon Kosher salt

cracked black pepper

1 large garlic clove, minced or crushed

1/2 teaspoon dried thyme

EVOO

2-3 Tablespoons of goat or sheep’s milk feta in a chunk

egg, lightly beaten

1 Tablespoon toasted pine nuts

1 Tablespoon fresh thyme, basil or oregano leaves

NOTE: (Since I went to the farmers’ market, I was able to get a variety of different colored zucchini and eggplants. If you are using the large, traditional purple eggplant and it has a lot of seeds, you will need to generously salt the slices and lay them out in a colander for about 20 minutes. This removes the bitterness from the seeds. Then rinse them well before using and pat dry. Since I bought eggplants with very few seeds, this step was not necessary. Do not buy the gigantic zucchini. More isn’t always better- it’s just more. Look for slim, straight zucchini with unblemished skins.)

Directions:

  1. In the bowl of a food processor, combine the flour, black pepper, thyme and sea salt. Pulse a few times to mix well. Add cold butter (divide the stick into 16 pieces). Pulse until the mixture is the size of frozen peas.
  2. In a small bowl, whisk together the yogurt and ice water until well combined. Pour it over the flour mixture and run the machine just until the dough starts to form a ball. Add the pine nuts and pulse once or twice to distribute. It will seem relatively wet compared to other pastry. Don’t worry! Turn it out onto waxed paper or plastic wrap and form a disk. (Make a ball and then flatten it.) Wrap the dough and refrigerate it for at least one hour. This can be made a couple of days ahead if you like.
  3. When ready to bake the galette, preheat the oven to 425 degrees F. Have a rimmed baking pan ready to use. Remove the dough from the fridge.
  4. Thinly slice the eggplant and zucchini. A mandolin is great for this task, but PUHLEEZE be careful! It is so easy to cut yourself badly. Don’t worry if the slices aren’t all gorgeous rounds – it won’t make any difference to the end product.
  5. Roll out your dough on lightly floured parchment paper to an approximately 14-inch round. Perfect roundness is not essential. However, do try to have even thickness of the dough. Turn the dough disk periodically while rolling out to keep it from sticking and to maintain the thickness.
  6. About 2 inches in from the edge, lightly spread the garlic. Then start layering your vegetables, building towards the center. This is not a Chicago deep-dish pizza. You do not load up the dough with as much stuff as you possibly can. Sprinkle with salt, a few cracks of pepper, the dried thyme and a drizzle of EVOO.               Savory Galette Stage 1
  7. Fold up the edges of the dough and just barely tuck them under to give a rounded look. If you prefer something even more rustic, then just fold the edges up over the vegetables. If the you have to create small folds in the dough, that’s just fine.
  8. Brush the edges of the dough with a lightly beaten egg.           Savory Galette Stage 2
  9. Bake at 425 degrees F. for 10 minutes. Then reduce the heat to 375 degrees F, add the feta cheese and bake for 25 minutes.
  10. Sprinkle the pine nuts over the top and bake for 5-8 more minutes or until everything is golden. Remove to a cooling rack and after it has cooled for a bit then take your fresh herbs and scatter them across the top. If you do it immediately, the herbs will blacken from the heat. Serve with a fresh salad and a nice crisp white or rose wine.

TIP: You will almost certainly have left-over vegetables and you don’t want to waste them, especially if you have lugged them home from the farmers market. These are the perfect left-overs to make a ratatouille – assuming you didn’t thinly slice more than you needed and simply left the remaining vegetables whole. Watch for my wonderful ratatouille recipe!

Finished Savory Galette

French Toast with Berries (or Challah French Toast)

When I first visited Lisa in Chicago (with Matt of course), I remember being struck by the fact that she made beautiful challah every single Shabbat.  I heard stories of how she would lug the dough to work and let it rise at her office, and Matt told me stories of how he loved punching the dough down as a kid.  But we’ll save the challah stories for another day for when we actually write about Lisa’s Incredible Challah (which really is quite incredible).

plated

The point is that I was inspired, as I am by all of Lisa’s cooking, to give it a go when Matt and I first started dating.  Years later, it’s become a Friday tradition, which means that we always have an entire loaf of bread for only two for the next week.  I used to worry that we would have challah leftover by the time the next Shabbat rolled around, but after discovering this recipe, the world in which there is “leftover challah” just sounds surreal.

I found this in a Williams-Sonoma cookbook that Matt gave to me as a Valentine’s Day gift one year (a great gift in that I love to cook and he loves to eat and suggest things to cook).  It’s the recipe from Sarabeth’s — that storied New York City brunch place — a place I used to love treating as an “occasion” spot for brunch when I first moved here.  And now we get to enjoy similar brunch at home, and plus making it at home means Matt gets a double portion!

This was a great chance to pull out the griddle and use it to make many toasts at once.  (I can’t believe I used to make pancakes and blintzes and French toast without one before since it has so vastly simplified the cooking process for all of them!)

challahalmonds

The one thing about the recipe is that there are a couple of steps so the dishes can pile up, but I’ve just used out regular dining plates for some of the prep work and then thrown it all into the dishwasher to make for easy clean-up.

soaking

Make sure to let the pieces of toast soak in the deliciousness that is the batter for at least one to two minutes for each side so that the toast will be moistened through with all that flavor…

almonds use this

…and when pressing the toasts into the almonds, make sure to press with enough force that the almonds stay on!  They add a wonderful crunch to the toast and I think really makes this French toast spectacular.

breadonfoil

The original recipe calls for raspberries on the side, but we happen to be on a blueberry streak, so I used blueberries instead.

Ingredients

  • 6 large eggs
  • 1 cup of half-and-half (or soy milk or almond milk, I generally use whatever milk is lying around the house already)
  • 2 tbsp sugar
  • Finely grated zest of 1 orange
  • 3/4 tsp almond extract (optional – but delicious if you add it)
  • 1/2 tsp pure vanilla extract
  • 8 thick slices of challah (preferably a day old)
  • Butter for cooking
  • 1 cup sliced almonds
  • 1 cup raspberries (or blueberries, or sliced strawberries, whatever berries strike your fancy)
  • Pure maple syrup for serving
  1. Preheat the oven to 350 degrees. Have ready 1 rimmed baking sheet.
  2. In a large shallow bowl, whisk together the eggs, half-and-half (or milk), sugar, orange zest, almonds extract, if using, and vanilla.
  3. Pour the mixture in a plate (easiest if you use a pasta bowl or any dish with a wider bottom and lip on the side) and add the bread, one slice at a time to the egg mixture, and turn gently to coat evenly.
  4. Let stand until the bread has soaked up some of the egg mixture, about 1-2 minutes.
  5. Place a griddle over medium heat until hot.  Lightly oil the griddle and the baking sheet (or just put foil down, which is what I do to save some cleaning hassle).
  6. Spread the almonds on a separate plate.  One piece at a time, take the bread from the egg mixture, letting the excess liquid drip back into the plate.
  7. Dip one side of the bread into the almonds pressing gently to help the nuts stick.  Repeat with all the remaining bread slices.
  8. Place the bread slices on the griddle, almond side down, and cook until the nuts begin to brown, about 2 minutes.  Flip and cook the other sides until golden brown, about 2 minutes more.
  9. Transfer to the baking sheet, almond side down, and bake until the center of the bread is heated through but still moist, about 10 minutes.
  10. Serve the French toast immediately out of the oven, throw some blueberries on top and slather in good quality maple syrup.

Serves 2 very hungry people, or 4 normal servings.

Adapted from Breakfast Comforts by Rick Rodgers.

Spinach and Black-Eyed Peas – Greek-Style

Spinach black-eyed peas finished

When I was a young girl, we used to shop in a grocery store whose produce section was run by a loud and generous Greek woman named Carla. She always had a smile, story and a treat for her special customers – and with Carla, everyone was special. One day she was telling us about this dish that her family made and it sounded delicious and easy to make. There never was a recipe – just Carla’s story – but ever since then I have been making this dish – first with my mother and now on my own. If it has a name, I don’t know it, but what I do know is that it is delicious and over the years I have never tired of making it. Now Frances makes it too.

I make mine with country pork ribs because that was how Carla told me the recipe, but I think it could be equally delicious with beef short ribs. You would simply need to adjust your cooking time to be somewhat longer for the beef, which also means you would add your black-eyed peas and spinach later. Try it that way and let me know how it works out. For now, here is my version of Carla’s family recipe.

Spinach and Black-Eyed Peas with Country Ribs

Yields: 4 servings

Ingredients:

1 large yellow onion, peeled and coarsely chopped

1 – 28 ounce can or 1 large box of crushed Marzano tomatoes with their liquid

4 meaty country ribs

2 Tablespoons EVOO

2 teaspoons finely chopped or crushed garlic

1/3 cup red wine (choose anything you would enjoy also drinking that deals well with tomato)

12 ounces fresh black-eyed peas (See Note)

16 ounces of frozen chopped spinach or its equivalent fresh

Kosher salt and fresh cracked black pepper to taste

1 -2 bay leaves

1 Tablespoon fresh oregano or 1.5 teaspoons good quality dried Greek oregano

1 small bunch flat-leaf parsley, roughly chopped

NOTE: I have made this dish with fresh, canned and frozen black-eyed peas and it has always turned out delicious. If you use canned peas, be sure to drain and rinse the peas. I use two cans around 15 ounces each. If I can’t find frozen or fresh or canned black-eyed peas, I have also used Crowder beans. And while the dish called for spinach, I believe it would also be tasty (different) with kale or even collard greens. Don’t be afraid to try what is freshest or most easily available.

Directions:

  1. Using a large, deep pan with a lid or a Dutch oven, saute the onion in the EVOO until just beginning to get translucent – about 5 minutes. Then add the garlic and stirring, gently, saute this for another 3 minutes. I like to salt and pepper in layers. I don’t use any more this way, but I know that my onions are flavored and then my ribs etc.
  2. Add the ribs by pushing the onion and garlic towards the side of the pan and brown them quickly, turning once. This will only take a few minutes. You should have enough oil in the pan, but if you feel the need to add a smidgen more, that’s okay too. If your pan is hot, the ribs shouldn’t really stick. Spinach black-eyed peas stage 1
  3. Add your tomatoes, bay leaves and red wine. If you are using dried herbs, add them now. Bring to a boil, cover and turn the heat down to a simmer. Cook for 30 minutes.
  4. After 30 minutes, add your beans, spinach, fresh oregano, salt and pepper and cook for 15 -20 minutes more. Yup, that’s it! And when you eat this dish, raise a glass to Carla, wherever she may be.

Eat with a lovely crusty bread (something with sesames would be great) and salad and serve the remainder of the red wine. This can be made ahead and gently reheated.

So Many Tomatoes – Heirloom Tomato and Plum Galette

Tomato and Plum GaletteMy life goes back and forth between extremely stressful and fairly boring. As a way to relax, I read mysteries and look up recipes. I came across this one from a link on Food 52 and thought that I would give it a try. The farmers’ market had beautiful heirloom grape and cherry tomatoes and the plums are at their peak right now. I made the crust Saturday night and refrigerated it until I was ready to finally bake the galette tonight.

Here is my version of Tomato and Plum Galette adapted from a recipe by Elizabeth Stark

Yields: 8 servings

Ingredients:

For the crust

1.25 cups, unbleached all-purpose flour

2 Tablespoons grated Asiago or Parmesan Cheese

1/2 teaspoon freshly cracked black pepper

1/2 teaspoon sea salt

8 Tablespoons (1 stick) unsalted butter, very cold

2 Tablespoons Greek Yogurt (I used Fage 2% Plain)

5 Tablespoons ice water

For the filling

3 cups heirloom tomatoes (I used a mix of grape and cherry)

sea salt

2 medium firm, but ripe, black plums

1/4 cup grated Asiago or Parmesan cheese, divided into 2 Tablespoon portions

1 egg, lightly beaten

cracked black pepper

1 Tablespoon torn fresh tarragon leaves

Directions:

  1. In the bowl of a food processor, combine the flour, cheese, black pepper and sea salt. Pulse a few times to mix well. Add cold butter (divide the stick into 16 pieces). Pulse until the mixture is the size of frozen peas.
  2. In a small bowl, whisk together the yogurt and ice water until well combined. Pour it over the flour mixture and run the machine just until the dough starts to form a ball. It will seem relatively wet compared to other pastry. Don’t worry! Turn it out onto waxed paper or plastic wrap and form a disk. (Make a ball and then flatten it.) Wrap the dough and refrigerate it for at least one hour. This can be made a couple of days ahead if you like.
  3. When ready to bake the galette, preheat the oven to 425 degrees F. Have a rimmed baking pan ready to use. Remove the dough from the fridge.
  4. Slice your tomatoes lengthwise into 4 pieces. Using your fingers, scoop out the seeds and slice away any core. Line a plate with paper towel and turn the tomato pieces onto the plate. Sprinkle with sea salt.
  5. Cut your plums in half along the axis, remove the pit and thinly slice.
  6. On a piece of floured sheet of parchment, roll the dough into a rough 14-inch circle. Brush away any excess flour.
  7. Scatter 2 Tablespoons of the cheese in a 12-inch circle inside the larger dough circle.next, arrange a band of tomatoes around this 12-inch circle. Working inwards, alternate circles of plum and tomatoes, tucking each layer up against the other.
  8. Fold up the sides of the dough (you will have some folds – this is fine). Lightly brush the folded over dough with the egg wash and sprinkle with sea slat and cracked pepper. Galette stage one

9.  Carefully lift the parchment and     galette onto the rimmed baking pan.  Trim parchment as needed. Bake at 425 degrees F. for 10 minutes. After 10 minutes, remove the galette from the oven and reduce the oven temperature to 375 degrees F. Sprinkle the remaining cheese over the top and bake until the galette is a rich golden brown, anywhere from 20-30 minutes depending on your oven.

Galette stage two

10. Cool for 15 minutes and scatter the tarragon leaves over the top. Serve warm.

Galette slice2

BBQ Ribs – from the Oven

BBQ RibsI have always loved a good saucy BBQ rib. In fact, in my younger days, I was known to eat an entire slab myself! Of course, that meant ignoring all of the wonderful side dishes, which I would never do now. I don’t have a grill or outdoor brick oven so I decided to look for a ribs recipe that I could make in my oven. I tried one recipe for Memphis style ribs with a dry rub and while my husband liked them, I wasn’t sold.

I like to watch the Cooking Channel and have done it ever since Frances’ husband was a little boy and we would sit together and watch. One of my biggest fans, he would always tell me: “You could do that, Mommy!” He was fortunate enough to find Frances and now he says: “You can do that, Frances!” And unlike me, Frances has been much more successful at getting Matthew to help out in the kitchen.

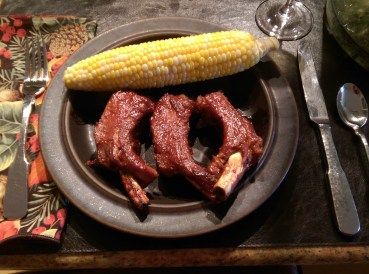
I’m trying a different recipe that I happened to see on the show Rev Run Sunday Suppers. This is his wife Justine’s recipe that I have tweaked. I’m serving it with corn on the cob and my Green Fatoush Salad. I learned years ago the secret to great corn on the cob from reading the late, great Craig Claiborn. You bring water to boil in a pot large enough to hold your corn. Add a good rounded teaspoon each of Kosher salt and granulated sugar. When the water has come to a boil, add your shucked corn and bring it back to a boil. As soon as it returns to the boil, cover the pot and remove it from the heat. After 5 minutes, you have perfect corn on the cob. We don’t even need butter or added salt when we eat it. Any leftovers (I always make extra) can be refrigerated and later used in salads, cut straight from the cob.

Saucy BBQ Ribs from the Oven adapted from Justine Simmons

Serves 4-5 people with sides and can be doubled. Leftovers can be reheated.

Ingredients:

Ribs

1 rack baby back ribs, cut into individual ribs (about 3.25 pounds)

2 Tablespoons seasoning salt, such as Lowry’s

1 Tablespoon garlic powder

Cracked Black Pepper to taste ( I do 25 cracks)

3 large garlic cloves, chopped

2 Tablespoons unsalted butter

1 Tablespoon EVOO

1 red onion, cut into chunks

Hickory BBQ Sauce

1 cup of ketchup

1/4 cup of dark brown sugar

2.5 Tablespoons of apple cider vinegar

3/4 teaspoon hickory liquid smoke

generous 1/4 teaspoon garlic powder

1/4 teaspoon paprika

1/4 teaspoon dried mustard

Pinch of cayenne

Directions:

  1. Season the ribs with 1 Tablespoon of the seasoned salt, the garlic powder and pepper. In a pot large enough  to hold the ribs without too much crowding, add the butter, EVOO, red onion and garlic. Saute lightly until the onion just begins to soften. Place the ribs on top. Add water to cover by 2 inches and sprinkle in the remaining 1 Tablespoon of seasoned salt. Bring to a boil, cover the pot tightly, reduce the heat and cook, simmering until the ribs are tender – about 1.25 hours. Don’t be disappointed when you see the ribs after they come out of the water. They are rather unprepossessing looking at this point. Trust me – it gets much better.
  2. Meanwhile, make the BBQ sauce: Put all of the ingredients in a small saucepan. Bring to a simmer over medium heat. Cover and cook, stirring occasionally for about 20 minutes.
  3. Preheat the oven to 375 degrees F. Transfer the ribs to a rimmed baking pan covered with foil and coat generously with BBQ sauce. Save some of the sauce for a second coat at the end. Cover the ribs with foil and bake for 15 minutes.
  4. Take the ribs out of the oven and turn on the broiler. Brush the ribs with more BBQ sauce and broil, turning once or twice and brushing with more BBQ sauce, until crisped and well done. (I did 10 minutes a side but every oven is different.) Serve hot. The ribs can be made ahead and reheated.

Moroccan Carrot Salad

I think one of the first big family meals with Lisa and family involved this delicious carrot salad that she had made.  It was so flavorful and pretty and this was one of the recipes that kickstarted my love of cooking and recipe swapping with Lisa.  (Plus she promised it was easy to make and so I was sold!)  This is one of those refreshing salads that is much more exciting than a salad of greens (though those can be delicious as well) and pairs extremely nicely with hearty meat dishes, such as the Siniyeh that I’ve posted about.

MoroccanCarrots

Ingredients

    • 2.5-3 lbs. carrots, peeled and cut into diagonal slices about ½” thick (for speed, you can purchase carrot chips)
    • ½ cup Extra Virgin Olive Oil
    • ½ cup Balsamic Red Wine Vinegar
    • 1 bunch flat-leaf parsley, finely chopped
    • 4-5 large cloves garlic crushed or finely chopped
    • 2T ground cumin
    • 2T sweet paprika or Spanish paprika which has a smoky flavor
    • ½ T Kosher salt
    • Freshly ground black pepper to taste

Directions
1. Cook carrots until tender but still firm
2. Whisk together all other ingredients and toss gently but thoroughly with warm carrots.

From Lisa!

Siniyeh – A Spin on Meatloaf

While flipping through The New Jewish Holiday Cookbook years ago after receiving it as a gift from Lisa, I came across this dish that was described as “spiced meat loaf with sesame topping.”  Intrigued, I decided to try making it and it has turned into a staple in our dinner rotations.  It’s probably not the prettiest dish, but the flavor makes up for it!  This goes extremely well with a bottle of spicy red wine, such as a nice California Zinfandel, or a hearty Cabernet Sauvignon and a zesty vegetable side, such as this Moroccan Carrot Salad.

siniyeh dinner

Ingredients

Meat Loaf

  • 2 lb ground beef or ground lamb (I generally use very lean ground beef)
  • 1 medium onion, finely chopped
  • 2 garlic cloves, finely minced
  • 1 cup of finely chopped parsley
  • 1/2 tsp ground cumin
  • 1/4 tsp ground cinnamon
  • 1/4 tsp ground allspice
  • 1 tsp salt
  • 1/4 tsp ground black pepper

Topping

  • 1/2 cup tahini
  • 1/3 cup water
  • 2 tbsp lemon juice
  • 2 tbsp finely chopped parsley leaves

Garnish
About 3 tbsp pine nuts

Directions

  1. Preheat the oven to 400 degrees. Coat a 9×13″ baking dish with nonstick spray or grease very well.
  2.  In a large bowl, combine all the meatloaf ingredients, and mix by squeezing through your fingers until well combined and smooth.
  3. Press the mixture into the bottom of the prepared dish.  Bake at 400 degrees for about 20 minutes, or until the top is browned.
  4. Meanwhile, prepare the sesame topping.  Put the tahini in a small bowl, and slowly add the water, stirring vigorously.  Stir in the remaining topping ingredients.
  5. When the meat loaf is browned, remove the dish from the oven and carefully drain off any excess fat that has been released from the meatloaf.  Be especially careful to not let the meatloaf fall out of the dish!
  6. Spread the prepared sesame topping over the meatloaf.  Sprinkle the pine nuts on top.
  7. Return the meat loaf to the 400 degree oven, and bake for about 10 minutes longer or until the topping is puffed and lightly browned, and the meat is cooked completely through in the center.

Makes about 6-8 servings.

Adapted from The New Jewish Holiday Cookbook, by Gloria Kaufer Greene