No Bake Nutella Cheesecake

I wasn’t planning on making any special desserts for Valentine’s Day, mainly because I had just made a week’s worth of post-dinner desserts in the form of pot de creme.  However, when Lisa sent me this round-up of recipes, I knew that I had to make the Nutella cake.  The thought of  basically taking a tub of Nutella and then not having to bake anything to create a dessert was too tempting to pass up.
_MG_6407.JPG

This cake vanished in a matter of days, and was wonderfully dense and like eating blocks of fudge on top of a graham cracker like crust.  I would probably make it with a graham cracker crust next time. Thanks to this recipe, I also learned what Digestives are.  True to their name, apparently they were originally used to help with digestion!  (A product name that describes exactly what it does? Brilliant.)

_MG_6406.JPG
While I could have added Hazelnuts, I couldn’t seem to find them in my grocery store and had not thought to add them to my nuts.com order, and as it turns out – I think it was much better without the extra nuts!
Ingredients
  • one 8.8-ounce package of Digestive cookies, or substitute graham crackers or chocolate wafer cookies
  • 75grams (5 tablespoons plus 1 teaspoon) soft unsalted butter
  • 400grams (one 371-gram jar is fine) Nutella, at room temperature, divided
  • 100grams (2/3 cup) hazelnuts, well-toasted and chopped (see note), divided
  • 500grams (two 8-ounce packages is fine) cream cheese, at room temperature
  • 60grams (1/2 cup) confectioners’ sugar, sifted
Directions
  1. Break the digestives into the bowl of a processor, add the butter and a 15-milliliter/1 tablespoon of Nutella, and blitz until it starts to clump.
  2. Tip into a 23-centimeter/9-inch round springform and press into the base either using your hands or the back of a spoon. Place in the fridge to chill.
  3. Beat the cream cheese and confectioners’ sugar until smooth and then add the remaining Nutella to the cream cheese mixture, and continue beating until combined.
  4. Take the springform out of the fridge and carefully smooth the Nutella mixture over the base. Place the tin in the fridge for at least four hours or overnight. Serve straight from the fridge for best results.

Popovers

One of the first restaurants I went out to eat in while in San Francisco for a business trip was called Wayfare Tavern. They had the most amazing smells in this upscale “tavern” of warm comfort foods being cooked, but I think my favorite part was that there was someone constantly walking around offering freshly baked popovers.  Given that it was a crowded restaurant and it was a full house that night, trying to attract the attention of the “popover man” was no easy feat.  It must be this reason that made me think popovers were incredibly difficult to make.

popover.jpg

While flipping through my Breakfast Comforts cookbook, however, I found to my delight that 1) popovers required very few ingredients, most of which I always have on hand anyways, and that 2) they were rather simple to make.

IMG_6380.JPG

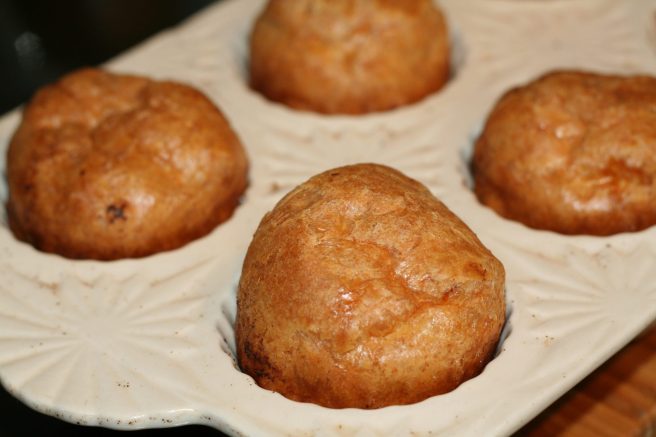
The result was just as light and fluffy as the popovers of memory, and I hope to find more reasons to serve them up!

Ingredients (for 12)

  • 1 cup all purpose flour
  • 1/2 tsp fine sea salt
  • 1 cup whole milk
  • 2 large eggs
  • 1/4 cup melted butter
  • Apricot or peach jam for serving

Directions

  1. Preheat the oven to 450 degrees.  Have a standard 12 cup muffin pan on hand.  In a bowl, whisk together the flour and the salt.  Make a well in the center of the flour mixture and add the milk and eggs.  Whisk just until combined.  Pour the batter into a glass measuring cup or pitcher.
  2. Place the muffin pan in the oven and heat until hot, about 2 minuts.  Remove from the oven and spoon 1 tsp of the melted butter into each cup.  Divide the butter evenly among the muffin cups, filling them half-full.
  3. Bake for 10 minutes. Reduce the heat to 375 degrees and continue baking, without opening the oven door, until the popovers are puffed, crisp, and golden brown, 20-35 minutes.  Using your fingers, gently remove the piping hot popovers from the pan and served with jam and butter!

From Williams-Sonoma Breakfast Comforts

Crockpot Chicken Tagine

I’m often convinced that Lisa and I are communicating on some other cooking channel that we don’t even realize.  I love all the recipes she sends me and just wish I had more patience to cook them all!  I was delighted to find that we both made a Moroccan Chicken with preserved lemons dish last Friday, although mine was the simplified “still feeling under the weather and resorting to a crock pot” version.  Nevertheless, we were in some ways all eating together!

_MG_6341

I happened to have preserved lemons on hand from ages ago when I (thankfully) had the forethought to make them, but I’ve also recently discovered that you can buy them!  As Lisa says, the internet has everything.

_MG_6342.JPG

I served my tagine over simple couscous made in leftover chicken stock, and making it took maybe 10-15 minutes max!

Ingredients

6 boneless skinless chicken breasts, chopped into large chunks
2 tablespoons flour
2 large onions, chopped
3-4 garlic cloves, chopped finely
1-2 tablespoon extra virgin olive oil
1 inch fresh gingerroot, finely chopped
6 ounces dried apricots
2 tablespoons tomato paste
2 (14 ounce) cans chopped tomatoes
2 (14 ounce) cans chickpeas
3 tablespoons honey
1/2 pint chicken stock
1 pinch saffron
1 teaspoon turmeric
4 teaspoons ras el hanout spice mix (or make up spice mix below)
1 teaspoon ground coriander
1 teaspoon ground cinnamon
1 teaspoon ground cumin
1 teaspoon cayenne pepper (optional)
salt and black pepper
chopped fresh coriander, to serve (Cilantro)
1 bag baby carrots
1 preserved lemon, chopped into small wedges
harissa (optional)

Directions
  1. Heat up olive oil in a frying pan/skillet & saute chopped onions & garlic for 5-10 minutes.
  2. Add chicken stock & gradually mix in flour until well mixed & not lumpy. Add honey & tomato paste & mix well.
  3. Add herbs,spices & finely chopped ginger with salt & pepper to taste. Finally add tinned tomatoes & mix well.
  4. Pour the above tomato,onion & spice mix into slow cooker. Add chicken & chickpeas & mix well.
  5. Add dried apricots making sure they are covered by juice. Add the carrots if using and preserved lemons
  6. Give it a gentle but good stir to mix everything together well.Crock Pot or Slow Cooker – Cook on high for about 3 to 4 hours OR automatic with keep warm facility for up to 8 hours.Serve with freshly chopped parsley on couscous.  Serve harissa on the side, so that guests can add according to how spicy they want their dish.

Adapted from Epicurious Easy Moroccan Chicken Tagine.


Butternut Squash Pizza

So if you read my post about the my attempts to work with puff pastry, you’ll know that there was some leftover that just did not end up getting used for the soleil.  The good news is that it was repurposed into a kind of butternut squash pizza!  Adding the cayenne pepper adds just the right amount of kick, and this is pretty easy to throw together for a weeknight dinner (assuming you and the puff pastry have come to terms).

_MG_6346

All we had to do was roast some butternut squash, caramelize some onions, and throw it in the oven to bake.  There have been instances in which I’ve made this and been too heavy handed with the cayenne – a note of caution: there is a distinct possibility to put too much cayenne, so if gauge accordingly when you sprinkle your ‘pizzas.’

~ 2 lb Puff pastry (for the pastry) rolled out into rough rounds or squares

For the filling:
1 small butternut squash (about one pound)
2 tablespoons olive oil
1 to 2 tablespoons butter (if you have only non-stick, the smaller amount will do)
1 large onion, halved and thinly sliced in half-moons
1 teaspoon salt
Pinch of sugar
1/4 teaspoon cayenne, or to taste
3/4 cup gruyere cheese

1. Prepare pastry: Roll out the two puff pastry sheets into rough rectangles or lopsided circles.

2. Prepare squash: Preheat oven to 375 degrees F. Peel squash, then halve and scoop out seeds. Cut into a 1/2-inch dice. Toss pieces with olive oil and a half-teaspoon of the salt and roast on foil lined (for neatness sake) sheet for 30 minutes or until pieces are tender, turning it midway if your oven bakes unevenly. Set aside to cool slightly.

3. Caramelize onions: While squash is roasting, melt butter in a heavy skillet and cook onion over low heat with the remaining half-teaspoon of salt and pinch of sugar, stirring occasionally, until soft and lightly golden brown, about 20 minutes. Stir in cayenne.

4. Raise the oven temperature to 400 degrees. Mix squash, caramelized onions, and cheese together in a bowl.

5. Assemble pizza: Spread squash, onions, cheese mixture over the dough, leaving a 1 1/2-inch border.

6. Bake until golden brown, 30 to 40 minutes. Remove from the oven, let stand for 5 minutes, then slide the pizza onto a serving plate. Cut into wedges and serve hot, warm or at room temperature. Serves ~4-5.

Adapted from Smitten Kitchen Butternut Squash Galette.

Sundried Tomato and Feta Soleil

Between being under the weather and a lot of travel, I managed to convince myself that cooking something interesting would somehow make me feel better.  After a sad round with gougères that just didn’t turn out right, it was comforting to have this turn out mostly delicious.  Technically, I’d made it for a party that I thought I was going to take food to and ended up with Matthew eating most of it instead (oops).

_MG_6358

The first go at this was a real struggle-fest, mainly because I think I hadn’t realized how touchy puff pastry was, much like Goldilocks and the bears – thaw too much and the dough is sticky, not thawed enough and too hard to roll out.  It literally had to be juuuuust right.  But who has time for that?

Anyways, this finally turned out after I gave up on the other puff pastry dough, and bought a whole new set.  But as it turned out, that other pastry dough still became a delicious butternut squash tart, so it was not all wasted.

The Smitten Kitchen version where I got this from is much more beautiful, but this turned out pretty delicious too!

Ingredients

Filling
3/4 cup sundried tomatoes in oil, drained
1/4 cup pitted kalamata olives
1 teaspoon dried oregano
1 large garlic clove, peeled
1 tablespoon olive oil
Salt and freshly ground black pepper or red pepper flakes to taste

Assembly
2 packages puffed pastry (leave in fridge overnight to thaw, or follow the box directions; remember, puff pastry = Goldilocks)
1 egg yolk beaten with 1 teaspoon water (for egg wash)

Dip
6 ounces feta, crumbled
2 ounces cream cheese, cold is fine
1/3 cup olive oil
2 tablespoons lemon juice
Freshly ground black pepper

Make the filling: Blend ingredients in a food processor until finely chopped and spreadable. Mixture will be thick. You can thin it with more olive oil if needed, but no need to make this thin like a sauce. Adjust seasonings to taste. Set aside.

Heat oven to 350 degrees.

Assemble the tart: Roll first package puffed pastry flat on a large piece of parchment paper or reusable baking mat into a 12-inch circle; use a 12-inch round plate or bowl to mark the size for a clean cut. Repeat with second dough, setting one aside in the fridge until needed.  (This part is hard if the dough isn’t the right consistency.)

Place first round on a parchment- or nonstick mat-lined baking sheet. Spread with filling to all but 1-inch from edge. Dab edges with water and place second round on top. Set a small glass upside down in the middle. Being careful not to cut through parchment paper or baking mat, cut away from glass (i.e. not through center) in quarters, or at the 3-, 6-, 9- and 12 o’clock marks. Cut through each quarter again, making 8 strips, and again, making 16 strips, and one last time so that you have 32 “rays” of pastry emanating from the center. If at any point in the cutting the pastry feels annoyingly soft and hard to cut, just pop the tray in the freezer for a few minutes to firm it back up.

Remove glass. Place finger near center of each ray (where it is most likely to break off prematurely) and gently twist each strand a few times. Beat egg yolk with 1 teaspoon water; brush it over pastry and sprinkle with seeds, if desired.

Bake for 30 to 35 minutes, until golden brown all over.

Meanwhile, make whipped feta dip: Blend all filling ingredients in a blender or food processor until smooth. Adjust seasonings to taste. Place in bowl for dipping.

Remove tart from oven, let cool on baking sheet for 10 minutes then transfer to a serving platter. Tear off rays of sun, dip in whipped feta; repeat as needed.

Adapted from Smitten Kitchen Feta Tapenade Soleil.

Oat and Whole Wheat Sandwich Bread

The thought of making my own sandwich bread never really occurred to me, and when it did, all I could think was that it would be more effort than it was worth. After all, the local grocery store has quite the panoply of breads to choose from every week.

thumb__MG_6323_1024.jpg

But then I came across this post from “Smitten Kitchen” and immediately had to try it because it just sounded so healthy and wholesome.  As it turns out, it wasn’t nearly as difficult as I thought it would be, and the result when toasted with a little dollop of butter ended up having a texture and flavor that I would not have dreamed bread could have.  Now the only trouble is that I’m going through it so quickly!  Thank goodness the recipe yield two loaves.

Ingredients

5 cups whole-wheat flour
2 cups rolled oats (I used Quaker oats)
1 tablespoon kosher or coarse salt
3 tablespoons raw or brown sugar, honey or agave nectar (I like the honey)
1 large egg
1/4 cup vegetable oil, plus a little more to coat bowl
1 1/4 cups lukewarm water
1 1/4 cups lukewarm milk, any kind
1 1/2 tablespoons instant yeast

Make bread dough:

  1. In the bottom of large mixing bowl, combine water, milk and sugar or honey, then stir in yeast. Add egg and oil and whisk until combined. Add flour, oats and salt and if mixing with a machine, combine with paddle attachment at the lowest speed for 1 minute. If mixing by hand, use a large spoon and stir for 1 minute. The dough will be wet and coarse, let it rest for 5 minutes.
  2. If using a mixer, switch to the dough hook and mix the dough on medium-low for 2 more minutes. By hand, do the same with your spoon. The dough will seem firm and more smooth, ideally supple and sticky, but if it’s still very wet, add a bit more flour, a spoonful at a time. If it seems excessively stiff, add a little more water, a spoonful at a time.  Continue to mix with dough hook or by hand for 4 minutes.
  3. Scrape dough out onto lightly floured counter. Knead a few times, then form the dough into a ball. Oil your empty mixing bowl and return dough to it. Cover with plastic wrap and let proof at room temperature for 60 to 70 minutes, or until doubled in buik or transfer to the fridge and let it ferment overnight or up to 5 days. If proofing in the fridge, remove the dough before the fridge about 3 hours before you plan to bake it.

Form loaves:

  1. Turn dough onto a floured counter and divide it into two equal pieces. Press each gently into a rough rectangle-ish shape.
  2. Fold in sides so that the first dough is roughly the width of your bread loaf pan (about 9 inches).
  3. Roll from bottom to top and then put this log into your bread loaf pan, seam side down. Repeat with remaining dough.  (This is really important as otherwise your bread will rise lopsidedly and then you’ll have delicious but highly irregularly sized bread which is not great for sandwiches.)
  4. Let proof at room temperature for about an hour, or until the dough is about 1 inch above the rim of the baking pan. Halfway through, heat oven to 350 degrees F.

Bake bread:

  1. For 35 to 40 minutes, rotating pans once for even color. (Then again, I forgot to do this and it turned out beautiful anyways.)
  2. The internal temperature should read 190 degrees F. Remove loaves from tins and let cool on a rack. If you’re planning to freeze bread, let it cool completely before slicing it.

From Smitten Kitchen, Oat and wheat sandwich bread.

Sachertorte

One of my favorite restaurants in NYC serves the most beautiful Austrian desserts in an old time-y, wood paneled room that feels like a time capsule that sends you straight to Inter-war Europe.  My favorite dessert there, the “Sachertorte” apparently derived its name from a famous hotel in Vienna called the “Hotel Sacher” where this dessert was first made.

thumb__MG_6334_1024

According to the cookbook this recipe derived from, this cake was invented by a sixteen-year-old pastry apprentice named “Franz Sacher” for Prince Klemens von Metternich.  In 1876, his son Eduard opened the now famous “Hotel Sacher” where this is still served today.  After having tried this famous dessert on both sides of the pond, I still think the one from NYC is better, and so I was over the moon when the chef published a cookbook and included the recipe for this dessert!

Ingredients

  • 6 tbsp unsalted butter, softened
  • 1/2 cup semisweet chocolate chips
  • 1/2 cup confectioner’s sugar
  • 1/8 tsp ground cinnamon
  • 4 large eggs, separated
  • 1 large egg yolk
  • 1/2 cup granulated sugar
  • 3/4 cup cake flour, sifted
  • All-purpose flour for dusting

Rum Syrup and Jam

  • 1/2 cup sugar
  • 1/2 cup water
  • 2 tbsp dark rum
  • 1.5 cup smooth raspberry (or apricot) jam (Don’t get preserves; while the cake will taste just as good, it will look a little lumpy as mine does below because of all the fruit chunks)

Glaze

  • 6 oz bittersweet chocolate, chopped ( 1cup)
  • 8 tbsp unsalted butter

Directions

  1. Heat the oven to 325 degrees.  Brush a 9″ round cake pan with butter and dust lightly with flour.
  2. In a double boiler, heat the chocolate until just melted.  Remove from the heat and stir until smooth.
  3. Line a baking sheet with parchment paper.  Set aside for now.
  4. In a large bowl, using a hand-held (or standing) mixer, beat the butter with the confectioners’ sugar and cinnamon until pale and creamy, about 2 minutes.
  5. Add the egg yolks, one at a time, beating after each addition until smooth.  Add the melted chocolate and beat until just combined.
  6. In another large bowl, using clean beaters, beat the egg whites at medium speed until slightly thickened and foamy, about 2minutes.  Gradually add the granulated sugar, and beat until the whites hold a soft peak.  Using a rubber spatula, stir one-third of the beaten egg whites into the yolk mixutre to lighten it.  Gently fold this mixture into the remaining egg whites until just smooth.  Fold in the cake flour.
  7. Using a spatula, spread the batter into the prepared pan.  Transfer to the oven and bake until a toothpick inserted into the middle comes out clean, 35-45 minutes.  Remove the cake from the oven and carefully flip it onto the prepared baking sheet.  Let the cake cool for about 20 minutes.
  8. Meanwhile, make the rum syrup: In a small saucepan, combine the sugar with the water and cook over medium heat, stirring occasionally until the sugar dissolves.  Stir in the rum, remove from heat, and let it cool.
  9. Generously brush the cake all over with some of the rum syrup, reserve the remaining syrup.  Cover the cake with plastic wrap and refrigerate overnight.
  10. Cut the cake horizontally in half.  Brush each cut side generously with the rum syrup.  Spread 1/2 cup of the jam evenly over the bottom of the cake.  Set the other half on top.  Spread the remaining 1 cup of jam evenly over the top and sides of the cake.  Refrigerate until set, about 2 hours.
  11. Make the glaze: In a double boiler, melt the chocolate with the butter until melted.  Remove from the heat, stir until smooth and let cool only slightly (too cool and the mixture will harden).  Remove the cake from the refrigerator.
  12. Pour the glaze over the top and sides of the cake, and then spread it evenly over the cake.  I like to put my cake on a cooling rack, put foil or something else below it, and then drizzle the chocolate so that it falls smoothly on the sides.  Refrigerate the cake until the glaze is set (yes, another 5-10 minutes of waiting before eating!) before serving.
  13. Transfer the cake to a cake plate, and serve (with whipped cream it is even more decadent!)


From Neue Cuisine: The Elegant Tastes of Vienna by Kurt Gutenbrunner

Classic Cassoulet

cassoulet1

It’s 7 degrees F outside and with the windchill, it feels like -19 degrees F. So of course, my husband and I decided that it was the perfect day to bundle up and go for a walk! I was on a mission since I had decided yesterday that I REALLy wanted to have some cassoulet and I knew that I only had some of the ingredients on hand. We walked first to Whole Foods which disappointingly did not have what I needed and then decided to go in the total opposite direction to another market. Thankfully Plum Market had the duck and armagnac sausage, demi-glace and duck fat that I needed. I already had the duck confit and the cassoulet beans which I had soaked overnight. We came home with our digits semi-frozen but feeling good so I set to work putting my cassoulet together. Many cultures have slow cooked beans and cured meats. Eastern European Jews eat cholent on Saturday for the Sabbath day hot meal, Americans grew up eating franks and beans, but no one has taken the slow cooked bean dish to greater heights than the Gascons of France. When Frances makes this dish, she makes enough for 12 and she and Matthew manage to consume all of it within a couple of sittings. We can no longer eat that way so I made a somewhat more manageable amount – enough for 6. Below is the recipe for 12 from D’Artagnan (where you can also purchase all of the specialty items if your grocer/butcher doesn’t carry them) along with my smaller amounts. It does actually get better the second day, so if you think you can eat your way through, go for the larger amount. The only real changes that I made were to use a good nitrite/nitrate-free bacon instead of ventreche (which is French pancetta) and to add a larger amount of herbs into my bouquet garni. I wish you could taste this. You just take a bite and close your eyes. There is a brief hushed silence while you allow the taste to be absorbed and – well, you actually sigh, it’s just that good.

Classic Gascon Cassoulet from D’Artagnan  

cassoulet2


Yield: 12 servings for original amounts. 6 portions if you use my changes. If I did not change an amount then that is because I didn’t change it from the original despite changing other amounts.

Ingredients

  • 3 pounds French Coco Tarbais Beans, rinsed and picked over (I used 3 cups dried beans)
  • Water, as needed
  • 12 ounces Ventrèche, in one piece (I used about 8 ounces good bacon)
  • 10 cloves garlic, peeled (I used 5 cloves)
  • 2 medium onions, skinned and cut in half ( I used 1 large onion)
  • 5 whole cloves
  • 1 carrot, coarsely chopped (I used 3 thin carrots)
  • 1 bouquet garni, made of 5 parsley sprigs, 3 celery leaves, 3 thyme sprigs, 1 bay leaf and 10 peppercorns, wrapped in cheesecloth and tied
  • 6 Duck Leg Confit, cut in half at the joint (I used 3)
  • 6 1/2 ounces Duck and Veal Demi-Glace, dissolved in 3 1/2 cups of water (I only ended up using about 2.25 cups and saved the remainder for another use)
  • 1 tablespoon tomato paste
  • Salt
  • Pepper
  • 2 packages Duck and Armagnac Sausage (I used one package – 8.5 ounces)
  • 1 pound French Garlic Sausage, cut into 12 slices (I used 8 ounces)
  • 1/4 cup Duck Fat, at room temperature

Directions

  1. Add beans to a large, non-reactive container(s), cover completely with water and soak overnight at room temperature. Keep water level several inches above beans. Check back every so often as beans will absorb a lot of water. Use a few separate containers if necessary.
  2. Drain beans, put into a large, heavy pot with whole ventrèche, garlic, carrot, bouquet garni and onion that’s been studded with cloves. Add enough water to cover at least 3 inches above beans. Bring to a boil over medium-high heat then reduce heat to low and simmer, stirring often, until beans are barely tender, about 1 hour.
  3. Drain beans, discard onion and bouquet garni, leave carrots and garlic with the beans.  Remove ventrèche, cut into ½ inch squares, set aside.
  4. Season beans with 1 teaspoon salt and several grindings of pepper.
  5. Preheat oven to 325 degrees F.
  6. In a medium skillet over high heat, sear duck and Armagnac sausages until just browned. Remove from pan, cut into thirds and set aside.
  7. Lightly grease large casserole, preferably earthenware or enameled cast-iron, with duck fat, on both bottom and sides. Place half of the bean mixture in casserole. Add duck legs, browned duck sausages, chopped ventrèche, and sliced garlic sausage. Drizzle with duck fat. Cover with remaining beans.
  8. Stir tomato paste into demi-glace/water mixture, mix well until dissolved. Pour evenly over bean mixture. Drizzle with remaining duck fat.
  9. Bake until hot and bubbling, about 2 ½ hours, checking occasionally to make certain the beans are not drying out. (See Ariane’s Recipe Tips below).
  10. NOTE:  Cassoulet may be prepared ahead up to this point, then cooled and refrigerated up to 3 days. Remove from the refrigerator to bring up to room temperature before proceeding.
  11. Increase (or preheat) oven to 400 degrees F. Bake cassoulet until top is browned, about 45 minutes. If at this point, cassoulet is not heated through, cut open the crust, pour ½ cup of water and/or demi-glace, and continue to cook until hot all the way through.
  12. Serve immediately. Each guest should get an equal proportion of beans to meats.

Ariane’s Recipe Tips:

Don’t hesitate to open the crusty top to make sure the cassoulet is not drying out. The texture should be similar to a thick stew. If it seems too dry or pasty, add some liquid, such as stock, demi-glace or even water. Typically, you’ll have to cut the crust and add liquid about 3 times before it’s hot all the way through. Some cooks in Gascony think cassoulet will only be ready after 7 times of breaking the crust and adding liquid!

If adapting the recipe, try to use as many confit meats as possible. They will give the most flavor.

Cassoulet should always be eaten very hot!

Don’t forget the leftovers. Cassoulet is even better the next day after flavors have had time to develop and marry.


Wild Rice with Celery and Pecans

I was never a fan of raw celery, thinking that it had to always be boiled to a mushy consistency for it to be of any interest.  While I have great admiration for people who can sit around and nonchalantly snack on raw stalks of celery, I’ve accepted that celery is just never going to make it into my easy, healthy, pack-it-on-the-go munchies rotation.  (Which is too bad since “ants on a log” always seemed so delicious in concept.)

Celeryrice.JPG

However, I found that celery, when finely diced, is extraordinary in this recipe where it acts as the perfect complement to the soft texture of the rice, and a nice companion to the crushed pecans.

It also just looked beautiful in the dish, with the varied colors from the black rice, the green celery and the toasted pecans.  We will definitely be reaching for this for our next dinner party!

Ingredients

2 cups of wild rice
8 cups chicken or vegetable stock, unsalted
3 stalks of celery, finely diced
1 cup of crushed pecans
salt and pepper to taste

Directions

Cook the wild rice according to directions on the package, substituting the water with the stock. Generally rinse the rice, and then bring the rice and chicken stock to a boil in a pot. Once boiling, set the cover on the pot, and bring it down to a simmer, or until all the liquid is absorbed.  Take the lid off the pot and fluff the rice with a fork.

Put the crushed pecans and set the pan over medium heat; cook until the pecans look lightly burnt (you’ll smell that burnt toast smell and that’s when you turn the stove off.)

In a large bowl, mix together the rice, the crushed pecans, and the celery.  Add salt and pepper to taste.

Adapted from Twenty Dinners.

Tomato and Goat Cheese Crostini

Most of my cooking adventures are well planned, with a timeline that goes backwards to gauge when I should start said adventure.  Unfortunately, there are a few times that the adventures are unfolding just fine until I discover that step 2 takes an hour instead of 15 minutes, or I forgot that something else was in the oven and so I can’t swap it out.  At these times, a little snack is all we need to get from “oh my goodness I am so hungry that I’m only seeing spinning wheels” to “oh hey, I’m feeling just fine, you take as long as you want to get dinner ready!”

_MG_6291.JPG

This snack was inspired from a starter at a restaurant that we recently discovered near Lincoln Center that seemed oh so fancy, and then I realized that I could easily make it at home since I seem to always have tomatoes and goat cheese (thanks to an amazing goat cheese sale at the grocery store) and a couple of delectable, tasty olive oils.

It can be used for dinner party starters, cocktail parties, or just that lazy Saturday afternoon around 3 when brunch has worn off but dinner is far off.  The best is that you can play with the ingredients and add any kind of herbs or differently flavored olive oils and still get good results, so experiment!

Ingredients

French baguette, cut in 1/2″ slices
2-3 tomatoes (any will work, I like the Roma ones for this)
Goat cheese
Olive oil
salt and pepper for taste
basil (optional – I didn’t use it in the photo, but it would be a perfect touch)

Directions

Preheat your oven 200 degrees F.  Line a tray with foil and place your bread on the tray and stick it in the oven even as it is warming up.  Depending on how toasty you like your bread, leave it in the oven for about 15 minutes.

Once the bread looks toasty, take the tray out of the oven, and drizzle olive oil on the bread slices.  Take about a tablespoon of goat cheese (I like to be generous and use large chunks of it) and spread on the bread.  Slice the tomatoes and press slices into the goat cheese.

Drizzle with a little more olive oil if you wish, and sprinkle some pepper on all the arrangements.  Serve immediately!